Introduction - This little gadget is a DSP audio signal generator that produces a known noise level and seven different FT8 signals on seven different frequencies. The noise and signal levels are also known precisely and so also are the signal-to-noise ratios (SNR). This composite signal can be run into a sound card or other PC audio input. The number of times these signals are decoded is the measure of the FT8 sensitivity.
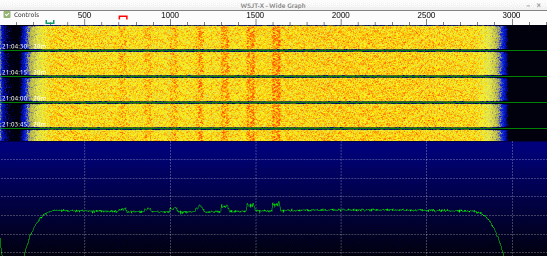
What does this do? Amateur radio operators quickly adopted the FT8 digital mode when it was introduced in 2017. It seems to be the sweet spot between QSO speed and weak-signal performance. At this point there are multiple implementations that suit multiple processors. In order to evaluate the weak signal performance of several of these, I needed a calibrated signal source. This project is such a device. The screen shot to the right shows a spectral waterfal receiving the 7-signals ranging is FT8 sign-to-noise ratio (SNR) of -22 to -16 dB in 1 dB steps. Typically, the WSJT-X decoder can provide 50% decoding at -20 dB SNR and simpler implementations are perhaps 2 dB less sensitive.
The frequencies of the seven generated signals start with 700 Hz for the -22 SNR level and progress higher in 150 Hz steps, ending with -16 dB at 1600 Hz. FT8 modulatio frequencies correspond to the lowest Frequency Shift Keying position and include eight tones separated by 6.25 Hz. Including extra spectrum for frequency shift transients, the total FT8 signal bandwidth is about 50 Hz. The WSJT-X spectral screen shot to the right illustrates all of this.
The entire FT8 collection of over-the-air signals is (very) roughly inside a single sideband (SSB) bandwidth of about 2500 Hz. For our simulator, this is set to 300 to 2800 Hz which is typical for SSB receivers. This generator includes a FIR bandpass filter that sets this SSB band. This filter serves two purposes. It guards against unwanted responses in the following sound cards and also allows direct measurement of the SNR using a DSP RMS detector that is discussed below. In the spectral plot the noise spectrum can be seen to fall off at the SSB band limits.
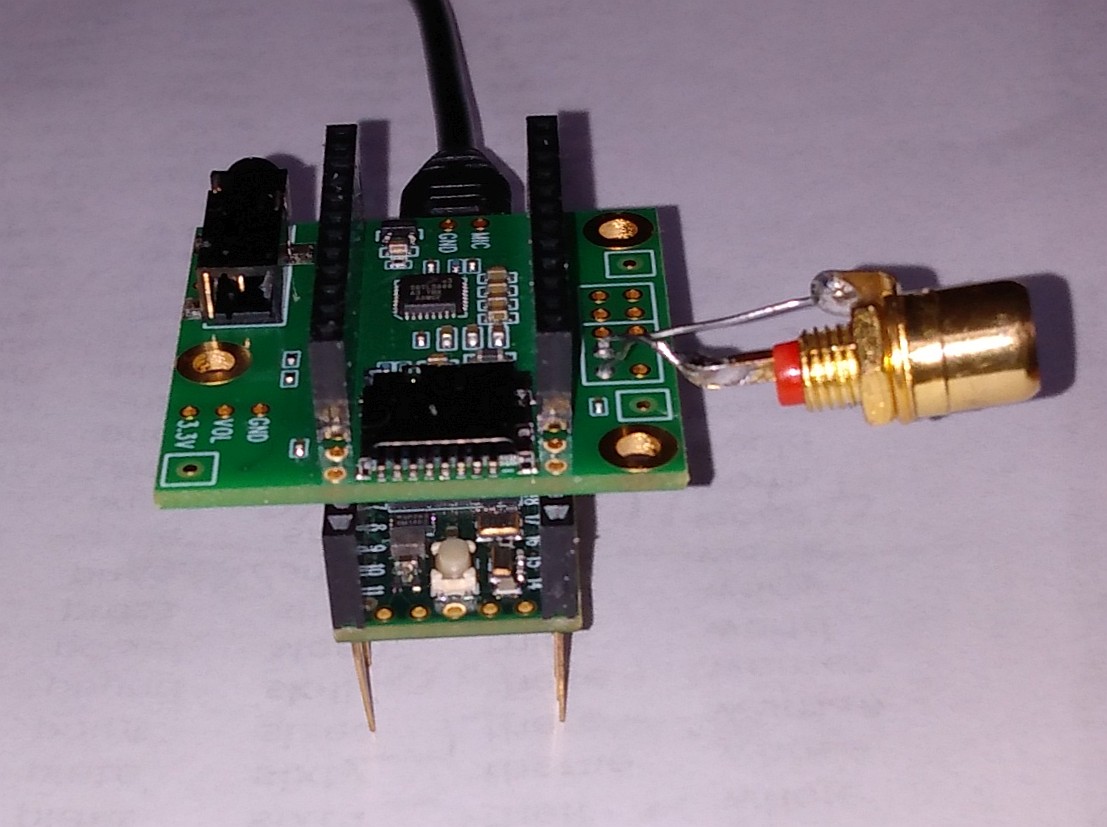
Hardware - The Teensy 4.0 is the processor board used for this project. It uses the ARM Cortex-M7 which includes 600 MHz floating point DSP instructions. Associated with the Teensy 4.0 is the Audio Adapter Board revision D for Teensy 4.x. The Audio Adapter provides stereo input and output, but we are only using one channel of output. For power, I have used an Anker Portable Charger battery USB supply, as it eliminates any ground loop possibilities. The battery is connected to the micro-B USB connection on the Teensy board. The Audio Adapter is supplied power from the Teensy by virtue of the coordinated pin alignment. In addition, an audio connector of choice is soldered to the Left Channel Line Output.
The two boards align with one another, keeping in mind where pin 1 is, completing all connections. Looking to future flexability, I use the long header pin/socket strips. The photo shows how the two boards can then plug together.
Software and Getting Started - The Teensy processors were designed to be software compatible with the Arduino IDE. To make that work, the Teensy people, PJRC, supply a package of add-on software called Teensyduino. First download and install the Arduino IDE. Use the 1.8.19 version (at least that is the case as of Nov 2022). Next, download and install the Teensyduino extensions per the PJRC instructions. Next, add on the Teensy specific floating point library. This is contained in the set of files for OpenAudio_ArduinoLibrary at Github. Installation of this library is done using instructions shown on this page. That may seem a bit cryptic, but if you follow through the three sets of instructions, you should should have installed all the programs required for this project.
If you have no experience with Arduino, you might want to explore the Teensy starter page. Also, be sure to go to menu Tools/Board/"Teensy 4.0" (or 4.1) and also Tools/USB Type:/"Serial." The next step is to open the Serial Monitor with a click in the Tools menu. If the Monitor will not open, there may be a problem with board or USB type selection. Once any issues are resolved for connecting the Teensy, you need to compile and load the FT8 generator program.
Following the instructions above, our OpenAudio_ArduinoLibrary was installed either by Zip file or by git download. Go to the directory/folder where this library was placed and open with the Arduino program the file Example/FT8Transmit7/FT8Transmit7.ino. As is usual for Arduino, you can compile, link and upload FT8Transmit7 with the single menu command Sketch/Upload. At that point the FT8 generator is running and sending out the signals and noise.
The Serial Monitor can be used to send a few commands that are mainly used to adjust the transmission time. When power is applied to the Teensy, the 15-second FT8 transmission will begin in about 2 seconds. This timing can be modified by the commands:
 =       Set local FT-8 clock to 0
 -       Increase local FT8 clock by 1 sec
p, P     Increase local FT8 clock by 0.1 sec
l, L     Decrease local FT8 clock by 0.1 sec
 ,       Decrease local FT8 clock by 1 sec
 ?       Help Display
Each of these commands is the single character followed by "Enter." Also, when operating from a battery where there are no commands, it is usually adequate to apply power about 2 seconds before the start of a 15 second period. That is simple!
The FT8 messages include a pair of dummy call signs tahat are always the same and a snr report field that in this case indicates the snr level of the generator. For the most part, decodes are either complete or nothing, so it is easy to see if it has occurred.
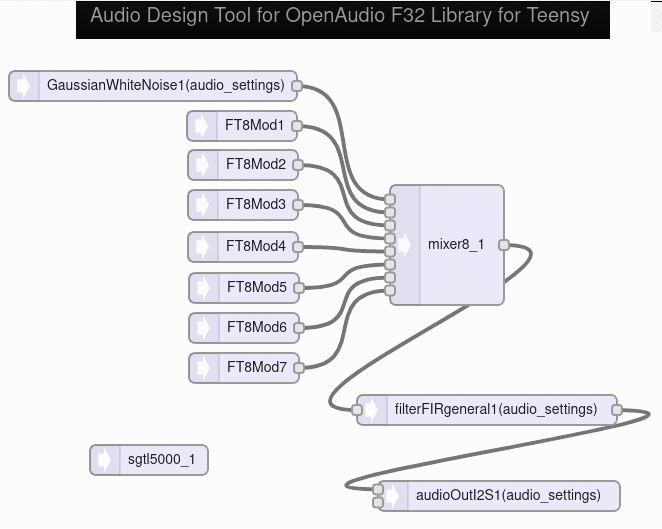
DSP Innards - The audio dsp programming of the Teensy processors is very convenient using either the PJRC provided Integer Library or as was used here, the Floating Point (F32)) Teensy Library. A side note is that the two libraries can be mixed using translation objects, if needed. Both libraries have graphical Design Tools that allow interconnecting objects with drag-and-drop convenience. For this project, the connections shown to the right were created using the F32 Design Tool. It can be seen that the noise generator plus the seven FT8 generators are combined in an audio mixer and then filtered and sent to the audio DAC The output of the Design Tool is Arduino/C++ code creating the 23 needed objects. This leaves a need for control functions to set the various frequencies, levels, and messages as well as to control the times of transmissions. The INO program downloaded from GitHub does this.
Calibration of the snr was done using a separate version of this same device that had only one generator. This is in another example program, FT8Transmit.ino. An RMS voltmeter DSP object is used to measure the signal and noise levels.
More - Two more examples are included with the F32 Audio Library. As discussed before FT8Transmit.ino provides a single FT8 signal with adjustable SNR. FT8Transmit7HP.ino is identical to the 7-signal generator of this note except the SNR are spaced by 3 dB:
    700 Hz  -22 dB
    850 Hz  -19 dB
   1000 Hz  -16 dB
   1150 Hz  -13 dB
   1300 Hz  -10 dB
   1450 Hz   -7 dB
   1600 Hz   -4 dB
The Teensy processor has lots of digital control pins that could be used to add controls and displays. But, that is going to be left to others as this simple device is already doing what most of us need!
Credits - This device is a collection of pieces that came from the efforts of many designers. The PJRC Teensy series reflects years of design work led by Paul Stoffregen with help from many contributors. The FT8 protocal is the result of mutiple contributors. See the paper, "The FT4 and FT8 Communications Protocols," by Steve Franke, K9AN, Bill Somerville, G4WJS and Joe Taylor, K1JT, QEX July/August 2020, pp7-17. The starting code for the F32 library was by Karlis Goba. See https://github.com/kgoba/ft8_lib and the Teensy work of Charley Hill https://github.com/WB2CBA/W5BAA-FT8-POCKET-TERMINAL For those not familiar with FT8, it is a widely used amateur radio communications format. A search of FT8 will lead to much information.
Issued 6 November 2022. - All Copyright © Robert Larkin 2022